
Your First Quantum Program: Build A Truly Random Number Generator With Qiskit
Get familiar with the Qiskit SDK and get your hands dirty with some Quantum programming

True randomness is challenging to create.
Most random numbers that you see being used in computers are created using deterministic algorithms called Pseudorandom number generators (PRNGs).
For example, Python’s random library uses the Mersenne Twister algorithm to generate pseudo-random numbers.
This means that they are not truly random. If one knew the exact seed and conditions used to create them, they would be able to create a similar number using the algorithm.
(Quick question. Do you consider a roll of a dice truly random? Be ready to get this belief shattered.)
Can quantum computers help us create a truly random number, then?
The answer is surprisingly — Yes!
Overview For Building A Truly Random Number Generator
We know from a previous lesson that on the computational basis, a qubit can exist in a superposition of two basis states (|0⟩ and |1⟩).

where α and β are complex numbers called Probability amplitudes.
When a qubit is measured, the probabilities of measuring the qubit in the states |0⟩ and |1⟩ are given by ∣α|² and ∣β∣², respectively.
We can create a truly random number generator called Quantum Random Number Generator (QRNG) using this principle.
Before we move forward, there is an important clarification to make:
These probabilities only describe the outcomes statistically over many trials and not the outcome of any single measurement.
This means that the result of each measurement is truly random and will be either of the two basis states (
|0⟩and|1⟩).
Steps To Building A Quantum Random Number Generator
These are the steps that we can take to build it:
Take a qubit in the state
|0>Create a superposition from this state
Measure the qubit to get a random result (either
|0⟩and|1⟩)
But how do we create a superposition from |0>?
This is done using a quantum logic gate called the Hadamard Gate.
We have touched upon this gate in a previous lesson, but a detailed lesson will follow to help you learn about it better.
For now, what we need to know is that the Hadamard Gate (H-gate) will put the qubit in the following state:

This state can also be written as:

The square of the probability amplitudes of both basis states results in 1/2 which means that this is an equal superposition state.
Measuring this state has an equal probability of returning either of the two basis states (|0⟩ or |1⟩).
Coding Up The Quantum Random Number Generator
Qiskit is an open-source software development kit (SDK) from IBM for working with quantum computers.
We will use it to build our Quantum Random Number Generator.
Alongside Qiskit, IBM also gives us access to multiple quantum computers to run our programs on.
On a free plan, we can use IBM’s quantum computers for up to 10 minutes of monthly runtime, which is good enough for running basic quantum programs.
Beyond this, you are charged $96 USD / minute billed for what you use.
Before we start programming on a Quantum Computer, let me introduce you to Qiskit Aer.
It is a high-performance quantum computing simulator written in C++ that is a part of the Qiskit ecosystem.
We can use it for most of our tutorials without executing our code on a real quantum computer each time.
Let’s learn to build our first QRNG using it.
We will run all of our code on Google Colaboratory to keep things simple.
Step 1: Installing Packages
We start with installing qiskit , qiskit-aer and qiskit[visualization] and importing them as needed.
!pip install qiskit qiskit-aer qiskit[visualization]from qiskit import QuantumCircuit, transpile
from qiskit_aer import AerSimulator
from qiskit.visualization import plot_histogramStep 2: Creating Our Quantum Circuit
Next, we initialize a qubit in the |0> state.
We also initialize a classical bit (the second argument) to store the measured results of our qubit later.
# Initialize quantum circuit with one qubit and one classical bit
circ = QuantumCircuit(1, 1)
We then apply a Hadamard gate to it and then measure it.
# Apply Hadamard gate to qubit at the index 0
circ.h(0)

# Measure the qubit at index 0 and store in the classical bit at index 0
circ.measure(0,0)
The measure method measures the qubit and stores the obtained value in the classical bit.
This is an irreversible operation because the qubit is no longer in the superposition state after measuring.
Step 3: Visualising Our Circuit
The circuit can be visualised using the following method.
# Draw the quantum circuit using matplotlib
circ.draw("mpl")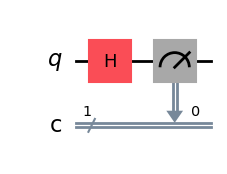
We can see that a Hadamard gate (H) is applied to the qubit (q), placing it in superposition, followed by a measurement (the meter icon) that collapses it to either 0 or 1 with equal probability.
This collapsed state is recorded in the classical bit labelled as c.
The result is stored on this classical bit at index 0, as shown in the image.
We can obtain the details of the qubit and classical bit as follows.
print(“Details of Classical Register: “, circ.cregs)
# Details of Classical Register:  [ClassicalRegister(1, 'c')]

print(“Details of Quantum Register: “, circ.qregs)
# Details of Quantum Register:  [QuantumRegister(1, 'q')]
In Qiskit, a Register is a collection of one or more bits/ qubits that can be used to perform operations.
The above outputs show that we have:
a Quantum register named
qwith one qubit, anda Classical register named
cwith one classical bit
Step 4: Preparing Our Simulator
Next, we create a quantum simulator using Qiskit Aer and convert (transpile) the quantum circuit into a form adapted to the simulator's architecture (ISA).
# Initializing the simulator
simulator = AerSimulator()

# Transpile
circ = transpile(circ, simulator)
Step 5: Simulating Results
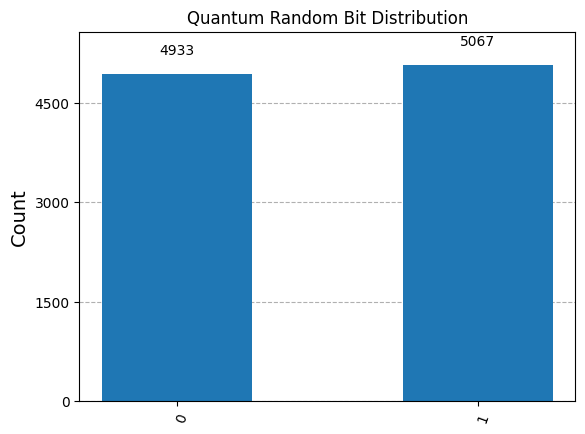
We finally run our circuit on the simulator 10,000 times.
# Run the circuit on the simulator 10k times
result = simulator.run(circ, shots = 10000).result()
Since quantum measurements are probabilistic, running the circuit multiple times allows us to see the probability distribution of the outcomes.
We then obtain the results from our experiment and plot them in a histogram.
# Get the data of our experiment
counts = result.get_counts(circ)

# Plot the data in a histogram
plot_histogram(counts, title='Quantum Random Bit Distribution')
We see a nearly 50–50 split for the experiment, and the more we run the experiment, the better this split becomes.
Step 6: Generating A Truly Random Number
To generate a x bit random number, we first run the circuit x times and store each measurement result.
# Run the simulator 20 times to generate 20-bit number
result = simulator.run(circ, shots=20, memory=True).result()

# Extract the results from memory in a list and print them
memory = result.get_memory(circ)
print(memory)
This results in the following list:
[‘1’, ‘1’, ‘1’, ‘0’, ‘1’, ‘0’, ‘0’, ‘1’, ‘1’, ‘1’, ‘0’, ‘1’, ‘1’, ‘0’, ‘1’, ‘1’, ‘1’, ‘1’, ‘1’, ‘1’]
The bits in the list can then be joined and converted into a truly random integer as follows.
# Join the bits in the list
random_binary_string = ''.join(memory)

# Convert the joined bits into an integer and print the result
random_integer = int(random_binary_string, 2)

print(random_integer)
Here’s our result: 957887
Congratulations! You’ve just created a truly random number using the power of Quantum mechanics.
Share in the comments the random number you generate when running this code.
Here’s the Google Colaboratory link for all the code.
If you’re new to Python, I highly encourage you to learn it, as it will help you immensely as a software engineer.
Thanks for being a curious reader of “Into Quantum”, a publication that aims to teach Quantum Computing from the very ground up.
See you soon in the next lesson!
